
Graphics Overhaul
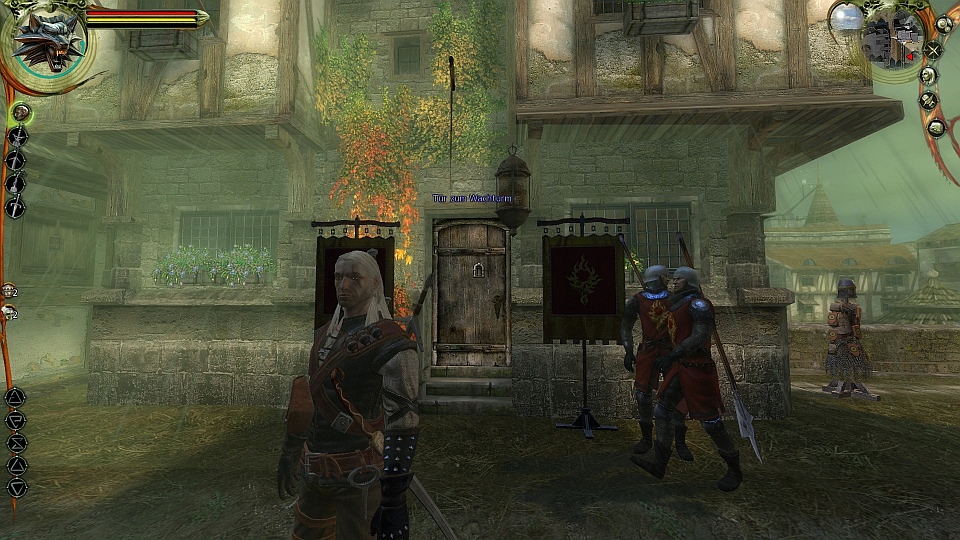
Rise of the White Wolf Enhanced Edition: This mod is a piece of jewel. A group of modders have spent more than 2 years on this project. What started as simple interface mod, grew to a full overhaul, improving the original game with a complete remake of interface, new options screen, inventory, journal. They even made new retextures for many characters, new Witcher armor, new cut scenes with Dandelion and new skyboxes. Most amazing thing of all? They have just finished this project, and managed to keep the atmosphere of the game.

The Witcher Hi-Res Character Models: This mod contains better textures for almost all NPC’s, monsters, and animals in the game. It will look high-definition in comparison with the original textures. We’ll need to merge this mod with “Rise of the White Wolf Enhanced Edition”, because those textures look even sharper but lack new textures for animals and monsters.
The Witcher Texturen: While the above mod focuses on the character, this mod has over 3000 remade textures for objects, buildings, walls, animals, minimaps, terrain, armour, magic (and other effects), ground Textures.
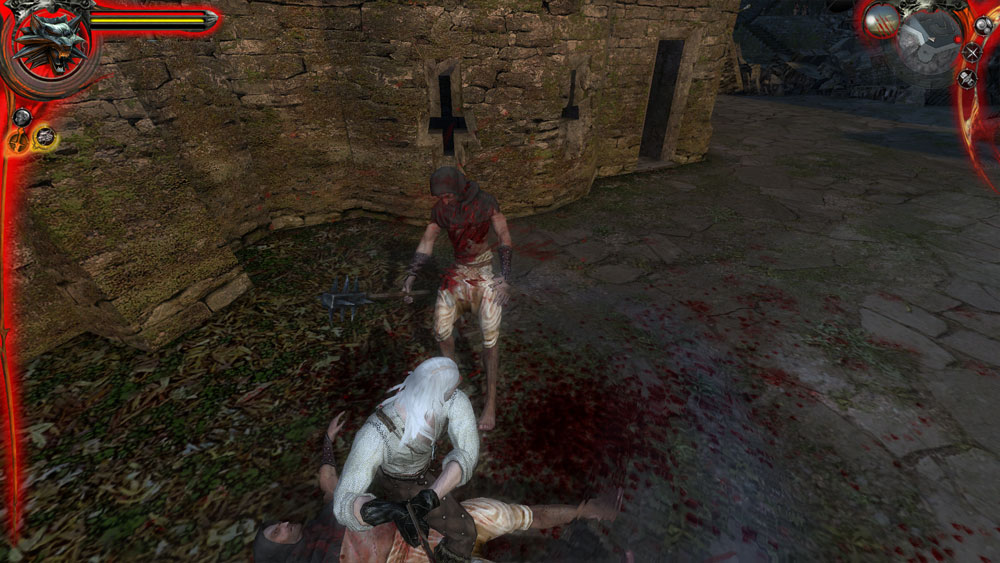
The Witcher Perfect Blood – Full DL: This mod updates the blood in The Witcher and, best of all, you will be able to see wounds appear on your enemies and yourself.
The Witcher Perfect Blood – Fix: This is a small fix for The Witcher Perfect Blood.
Perfect Rain Mod: This mod alters the rain in a much more natural appearance.
Mechanics
Full Combat Rebalance: FCR might still be the biggest modification created for The Witcher. The author, an employee of CD Projekt RED, has remade the combat mechanics almost from the scratch in his spare time. He made it much more realistic. Fights need more tactics and strategy, making them more brutal than the vanilla settings. FCR also offers a new design of the PC’s and NPC’s parameters, a full skill tree overhaul (including sword style rules). But also a much faster and lore-close combat and dozens of non-combat related improvements. This all comes with a fully customizable installation with the ability to install each feature separately (see below)
Sex Takes Time Mod: The Witcher 1 has a lot of sex(ual) scenes, but those always felt incomplete for me. Whenever Geralt had sex, they stayed in the same location, no time passes, and there wasn’t any conversation about if afterwards. Lucky for me, there is a mod that improves this.
Leuvaarden Buys Salamandra Badges: A mod with the sole purpose to sell Salamandra Badges to Declan Leuvaarden.
Scabbard Mod: This one adds 17 scabbard models to all swords and a new sword. This mod is made by the same guy as “FCR”
The Witcher Alchemy Mod – Better Color Coding: The ingredients for alchemy can be confusing. This mod aims to simplify the ingredient management and potion-mixing by updating the icons for alchemy. It does this by adding a colour, representing each ingredient’s primary and secondary components.

Plentiful Herbs for TW1: Alchemy is a very important aspect in the game. You will need to make potions and use them if you want to survive. But because you don’t want to spend hours collection herbs, this mod will make herb bushes produce more herbs per day.
Stop the Rain for TW1: In my latest play through, it felt like it was always raining. I had to use this mod to stop the rain from time to time.
Installation
This installation process will be quite different than usual, because we are going to merge multiple texture mods.
- First you have to create an “Override” folder, inside your \Data folder. (Probably located in: C:\Program Files (x86)\Steam\SteamApps\common\The Witcher Enhanced Edition). This is the folder where you manually install the mods. In this folder you place all the mod files together, never within separate folders inside your Override folder. Else you might have conflicting textures.
- After you have created the empty “Override” folder, it’s time to install some mods. This guide contains some mods that use an .exe file to install. Lets start with “Rise of the White Wolf Enhanced Edition” by using the .exe file. When you get to the option menu of the installer, select everything and continue installing.
- Secondly, install “Full Combat Rebalance“, with all options selected.
- After that, run “Scabbard Mod” installer. At the options, select “The Witcher EE with FCR” to make it compatible with FRC
- Lastly, run the .exe from “The Witcher Texturen” but don’t point it towards your \Data folder. Why? Because this mod makes a folder called “The Witcher”, while we are working with a “The Witcher Enhanced Edition”. What I suggest, is to install the mod in a temporary separate folder. Once installed, move everything from the “\The Witcher\Data\Override” (made by the “The Witcher Texturen” mod) to your override folder (the one you created in step 1). It’s about 2975 .dds files, so it can take a while.
- After that, download the file from The Witcher Hi-Res Character Models. We are now going to manually merge this mod with “Rise of the White Wolf Enhanced Edition” and “The Witcher Texturen”. This way, you’ll have best of both mods. But you need to delete +60 files from the “The Witcher Hi-Res Character Models” file. This is the list of the files you have to delete:
- an_sheep_c1
- an_sheep_c2
- cr_adda1_g1
- cr_assas1_c2
- cr_beren1_c1
- cr_beren1_g1
- cr_bruxa1_c1
- cr_bruxa1_g1
- cr_deidre1_c1
- cr_deidre1_g1
- cr_drown1_c1
- cr_drown1_c2
- cr_elf5_c1
- cr_elf5_g1
- cr_eskel1_c1
- cr_folt1_c1
- cr_folt1_g1
- cr_golem1_c1
- cr_golem1_g1
- cr_grav1_c1
- cr_guard1_c1
- cr_guard1_c3
- cr_guard1_c4
- cr_guard1_c5
- cr_guard1_g3
- cr_guard1_g4
- cr_guard1_g5
- cr_guard2_c1
- cr_jaskr1_c1
- cr_jaskr1_g1
- cr_kalks2_c1
- cr_knigh1_g1
- cr_knigh3_c1
- cr_knigh3_c2
- cr_knigh3_g2
- cr_lamb1_g1
- cr_maggot_c1
- cr_naked3_c1
- cr_order2_c1
- cr_order2_g1
- cr_order5_c1
- cr_order5_g1
- cr_order5_g2
- cr_order5_g3
- cr_order5_g4
- cr_order5_g5
- cr_order6_c1
- cr_order6_g1
- cr_pries2_c2
- cr_pries2_g2
- cr_prof2_c1
- cr_prof2_g1
- cr_rayla1_g1
- cr_scoia5_c1
- cr_scoia10_g1
- cr_toruv1_g1
- cr_triss1_g1
- cr_triss2_c1
- cr_triss2_g1
- cr_vanes2_c1
- cr_vanes2_g1
- cr_vesem1_c1
- cr_were2_c1
- cr_wicht1_c1
- cr_wicht2_c1
- cr_wicht2_g1
You should have 324 files left afterwards. Move those to your “Override” folder
- Now we are going to install the last 3 graphic mods: “The Witcher Perfect Blood – Full DL“, “The Witcher Perfect Blood – Fix” and “Perfect Rain Mod“. Extract all the files from the first mod in your \Override folder. When asked to replace the current files, select “Yes” (Personally, the textures from the “The Witcher Texturen” look a bit too bright. If you want the original ones, select “No” instead).
- Now replace the “attackeffects.2da” with the one from “The Witcher Perfect Blood – Fix”. This file has to be placed in the \Data folder, not your \Override folder
- Last, place the files from “Perfect Rain Mod” in the usual folder (\Override), and overwrite the files by selecting “yes”.
- Install “Sex Takes Time Mod” by extracting the folder “SexTakesTimeMod(updated)” in your \Override folder.
- Do the same for “Leuvaarden Buys Salamandra Badges” by placing the extracted folder (“LeuvaardenSalamandraBadges”) in \Override.
- The next step is to extract all files of “The Witcher Alchemy Mod – Better Color Coding” in our favorite \Override folder.
- “Plentiful Herbs for TW1” requires a bit more work. First you have to extract the downloaded file. This contains 8 other compressed files. Extract all those together and place them in your \Override folder.
- The last mod is “Stop the Rain for TW1“. Extract and place in \Override.
At the end, your override folder should look like this:

Downloadlink to my “Override” folder
Since there are some people who all have different graphical problems, I have permanently uploaded my “Override” folder to our (= GamingBoulevard) MEGA account. Please note that this folder contains only the textures and should only be used when you have problems with some mods. You can’t just download this file and hope it will work. You still have to follow the guide to install everything.
- Get my folder here
- Completely delete your old override folder. If you have installed other mods, redownload them and install them as last.
- Unpack the .rar file and move them in the \Data folder, where you have just deleted the old “Override” folder.
Now you should have all the same files as I have, so please, if you are still running into troubles, feel free to contact me any time on: amstroid@gamingboulevard.com or leave a comment.
Note: You will need to install the .exe files from the other mods as this override folder doesn’t contain the files installed by those programs.
SweetFX
So, to finish this guide, I want to give you a guide on how to install a SweetFX preset. This is a small d3d application that allows you to add all sorts of post-processing effects.
Head over to OmniFX Preset or Proudi’s – Awesome FX to check out what I mean, there are more Presets for The Witcher Enhanced Edition, those are just an example.
- Download the preset you like the most
- Go to http://sweetfx.thelazy.net/?cat=3 and download the configurator
- Extract it to a folder of your choice and run the configurator
- Click Add Game and navigate to “Steam\SteamApps\common\The Witcher Enhanced Edition\System” and select the file “witcher”
- Once added, on the right side, click “Add SweetFX” You should see the middle screen full with text
- Now click “Save / Load configurator” and in the new window “Import preset”
- In the new window, navigate to the “OmniFX Preset” text file you have downloaded earlier
- Once it is imported, click “Load selected preset”
- After that, hit “Save new config” and your preset should be good to go. You can launch the game from the configurator or you can start it manually
- Normally, AA should be disabled, if not you have to disable it manually
- Use the “Scroll lock” key on your keyboard to toggle the SweetFX on and off.
Troubleshooting
If you come across these kind of problems:


Please make sure you are running the latest graphic drivers. If you still have the problems after, run the game with Texture Details on High, that should fix the bug, as shown below:


Conclusion
This should give you a nice fresh look for your playthrough in preparation for The Witcher 3. I know it did for me.
Please leave a comment if you run into any kind of trouble. And keep an eye on us, for our next guide will be a modding guide for The Witcher 2
I installed all of the mods you mentioned plus some others, everything went fine until in chapter 1 Declan Leuvaarden did not appear. I saw his name tag but not his body, do you or somebody else knows a fix.
nevermind. i was doing it wrong all this time. placed the executables inside the overide folder too. damn it should have read more about it. thanks for the superb mod! keep it up!
I followed the instructions and it worked fine until i discovered that some NPC (e.g. dwarven blacksmith in viziman outskirt, declan leuvarden in dike) are physically missing and i cannot talk to them because there’s nothing to click. i know that they are there because their names are floating and i can hear them speaking.
any thoughts why is this happening?
When downloading the rise of the white wolf mod should I download the setup version or zip I’m a little confused…?
setup version
If I use these mods will it affect my save file being able to carry over to Witcher 2 then Witcher 2 to 3?
No, that won’t be carried over
Basically what I am asking is if I would The 1st Witcher game can I still carry my save over to The Witcher 2… Then if I mod The Witcher 2 will it let me carry my save over to The Witcher 3… to put it simple will mods messy save file up to where I wouldn’t be able to carry my choices over to the next game?
Basically what I said was that you can mod your game. It won’t be taken over since the game only takes choices and progress with you.
To put it simple: Mod away! It won’t interfere with your save game.
Hey Amstroid,
I’ve just finished the DL for the Rise of the White Wolf mod as the first step like you said. And it created a z_zrotww folder with all the relevant textures etc in the data-folder, so it is the mods main folder in which everything relevant to the mod can be found. My question now is why your Override folder with all the complete textures from the mod etc. is missing some of the folders/files one can find in the z_zrotww folder? For example in the z_zrotww folder is a sub-folder called “fonts” in which are 2 .2da files, changing the dialog colors and fonts respectively. In your Override folder those files are missing completely. The only .2da file in your Override folder is the “attackeffects.2da” file. So I don’t really know what to do with the files of the Rise of the White Wolf the .exe has now placed in the data-folder in form of the z_zrotww folder. There are a couple of other files missing as well since there are a couple more folders in which are more than just .dss files which are also not to be found in your version. Am I to just delete all those files or just dump them into the Override folder as well? Or did you cut them out deliberately? Since you said to run the executable, I don’t understand why you don’t have those files anywhere?
On another note, in a reply to another question you said that the executable makes the correct folder themselves, alas the Override folder. I guess that the folder z_zrotww functions just the same as if it were the Override folder? So I won’t have to move all the files from the z_zrotww folder to the Override folder I made myself beforehand (which is still empty btw since the .exe didn’t care for its existence, which I guess is to be expected)?
Just so you know, I dled the “setup version” file from the mod-page of RotWW on nexusmods and selected the main folder as the installation path as the mod itself told me to, not the data folder or even the Override folder in the data folder. If you wanna see yourself what I’m talking about (since you probably won’t know the mods contents off the top of your head), just dl the .zip version on the nexusmods page and go e.g. into the folder I stated above and you will find those 2 files.
I would appreciate a clarification on what to do with all those files that don’t appear anywhere in your Override folder. Thx for an answer in advance and I hope I haven’t missed an answer to my problem to be found in the guide or comments!
And nevertheless very helpful and great guide to get a good first overview or what mods to pick/consider for sb. whos clueless on what mods are good or essential or just are compatible bc. tested by you!
Thanks for a GREAT guide! 🙂
I’m new to applying mods to a game (and *especially* THESE mods to THIS game), and I’m a little confused:
You say to create a new folder “….\Steam\SteamApps\common\The Witcher Enhanced Edition\Data\Override”, and say that we will install all mods to this new folder. However, on the very first mod (ROTWW), the instructions say to “SELECT MAIN DIRECTORY OF THE WITCHER DURING INSTALLATION” – so which is it; the main game folder, or the new Override folder? A little clarity here would be a BIG help for us to not screw things up.
Same kind of thing for the other mods which are also installed by an executable – which folder exactly should we specify the executable to install to, in each case (you have specified what to do for one of them, the ‘Texturen’ mod)?
The archived mods are easy – they are just unpacked and can be moved around at will; even I can get this.
Not so the executables.
Could you please be so kind as to clarify the destination folder for each mod which has its own executable?
Philip
To be honest, I’ll have to check it. It’s been a year since I made this guide.
From what I remember (and from what’s the methode most of the times), all executables have to be directed to the main folder.
All the mods that you manually install have to be placed inside the override folder.
By the way: Most of the time, the executable makes the correct folder themselves. In this case, it should make an “Override” folder. It’s not always the case, but if you see an “Override” folder inside an other folder (for example \Steam\SteamApps\common\The Witcher Enhanced Edition\Data\Override\Override) then you know that you have installed a mod in the wrong directory.
I’m using “Override” as an example here, but generally you can apply the same logic when modding other games. If you see duplicates, it is most of the time because you have installed a mod incorrectly.
Hi! firstly, thank you very much for your guide.
i got 3 problems,tho:
sometimes i have some fps drops so my game stops 2 seconds, which is very frustraring.
The second one is a green fog which appears when there is a storm (in the temple quarter and in the swamp).
Third problem, my game crashes sometimes.
I have a super PC with a gtx970 , so i really dont understand What’s the problem. Thank you kindly!
Heya, sorry for the late reply. Have you updated all the drivers and are you running on the latest version of the game?
Quick question,
Once all the mods are put in the override folder do I then need to move the contents of that folder into the data folder? What do I need to do to in essence turn those mods “on”
Thanks!
Weee, thank you so much for this guide! Not only is it a great guide to get multiple mods to be compatible, but it also taught me some stuff about modding ^_~
I did have a question, though. I’ve added all of the mods (except the blood ones… I’d rather avoid excessive gore). When I finally launched the game, though, the the camera and movement felt really clunky. Do you know which mod might be responsible for that? Whenever Geralt starts to run, he just slides for a good two feet before any running animation starts. Also, when I move the camera around, it kind of makes me dizzy. I can’t quite place what’s wrong, but there’s some sort of lag or distortion or something… like I’m looking through a fish lens camera. I dunno..super weird..
Also, cutscenes are super laggy and images get cut (like if a person is walking, half of their body is where it should be, and the other half lags behind).
I’d appreciate any help! -^_^-
Heya, thank you for the reply. Sadly, from what I can make up from your problem, it seems that your computer isn’t strong enough to handle The Witcher with all the mods. It seems like you get a lot of FPS drops of some sorts.
Just wanted to take the time to thank you for the guide on modding The Witcher. Was looking to start my first playthough and now it will be a more enhanced experience and put my Witcher 3 experience into context. Thx!
Thanks! Really appreciate the gesture 🙂
I’m getting an issue when trying to install the SweetFX for the game. Tried both presets, and both of them are giving me the following error message: “The procedure entry point CreateDXGIFactory2 could not be located in the dynamic link library C:\WINDOWS\SYSTEM32\d3d11.dll.” Any idea what is causing that?
Great mod list thank you 🙂
Two comments :
The Witcher Alchemy Mod – Better Color Coding contains texture already present in Rise of the White Wolf Enhanced Edition. So I think that put them in Override folder will not make them appear ingame.
Also, why do you say to place the “attackeffects.2da” in the \Data folder, not your \Override folder ? I never read that on the mod page.
Thanks for answers 😉
As far as I can remember (It has been a long time since I wrote the guide) “Rise of The White Wolf” doesn’t contain similar ingredientstextures that “The Witcher Alchemy Mod” uses.
Regarding the “attackeffects.2da”, I can’t remember :/. It seems to me that it should be installed in the “\Override folder”. Perhaps you can try to place it there and share the experience?
I unfortunately can’t get Rise of the White Wolf mod to install. It keeps saying, that the cabinet file ‘disk1.cab’ is corrupted, or that the source file disk1.cab needs to be verified. I have the Steam version of The Witcher Enhanced. I have tried a few different versions of this mod, done everything the read me says, and gone through all the posts and forums and tried all the suggested fixes and workarounds and I’m still getting the same issues. Any Ideas?
Try to redownload the mod? It looks like the file itself went corrupt while downloading
It worked! Thanks! It’s Strange I downloaded it from three different sites and they all got corrupted, never had that happen before.
If there is anybody having textures missing after speaking to someone; you should delete the dds files related to witcher hence delete every dds file on your overrite folder which starts with cr_witch or geralt. You may try another mod for their retexture. you may try this one : http://www.nexusmods.com/witcher/mods/646/?
Thanks for writing this guide Amstroid, looks great. However, I’m having a small problem – After starting a new game, the character names have all disappeared and I can’t seem to make them reappear. I’m new to the game, wanted to see the backstory before playing W2 and W3 so would be good to be able to know who’s who! Any suggestions?
Ow, I think that’s an option from FRC, not sure. You might check it by reinstalling that mod.
Thanks for the reply Amstroid. I’ve uninstalled and reinstalled FRC and found the option – all is good now. Thanks!
This guide was super helpful. Following it was much nicer than trying to figure out myself how to get a bunch of mods to work together. A+ work.
What about the “Stuff That Makes Geralt’s Life Easier” mod? I wish you’d have added that one too.
Personally, I don’t like that mod, that why I haven’t included it. But the guide is just a suggestion, nothing prevents you to install extra mods if you want 🙂
For those who want it; a ‘new’ mod for Bigger Text has been uploaded to nexus. file number 697
Great guide mate! Searching around for good W1 mods is difficult and your guide helps greatly. FYI, you can delete texturen’s suggested directory and use /The Witcher Enhanced Edition in its place. Just make sure it’s installed to the main directory because it installs into the /Data/Override subfolders automatically.
Default Geralt sure is ugly.
Forgot to mention, the main reason to install texturen vs. copying is it comes with its own uninstall file.
True!
I only have a question! Where should I install the Rise of the White Wolf Mod?? Im getting some troubles running it!
Really great job! Thank you for taking the time to help us enjoy this gem to the fullest extend! (Since many of us cannot enjoy Witcher 3 with our 8 year old PC)
I’ll try that then. Thanks anyway man, this post has been really helpful to me and, I imagine, to others who are new to TW1 &/or modding in general. Cheers!
Hey Hamstroid,
I followed all your instructions and have got the mods installed correctly (I think) but am having a problem with the textures. I’m running the -dontForceMinReqs with the recommended texture fix mod, but still Geralt’s clothing won’t load so I’ve got him clothing in white stripes. It’s fine for the cut scenes, and for the first bit of Kaer Morhen where you grab the sword, but thereafter it’s messed up. Any tips?
I’ve tried setting my NVidia manager to always use it for witcher.exe instead of the integrated graphics, but no joy there.
I’ve also tried deleting the texture fix mod. I can still edit the textures even with -dontforce, so do think there may be something in one of the texture mods that let’s me do that? Either way I’m still getting crazy numbers on the texture setting.
Would really like to play this game, but it’s proving a lot of work!
Thanks in advance,
i_love_beige
Yeah, sadly it’s a problem I have been trying to fix. It has to do something with your graphics card not being registered. You should check the official forums, there are some topics handling that specific problem. Join those, perhaps they can find a solution faster.
I have 3402 DDS Files, i guess i should have not installed the Texturen Patch 1.1
Naah, that shoudn’t be a problem. Even if you haven’t deleted every last file of them, it shouldn’t give a huge problem.
I prefer to delete those files so that all characters have the same “sharpness”. I don’t like it if Geralt looks “1080p” and Triss looks “480p” (per example).
Hi Amstroid, I’m having a problem here. I’m was installing the Rise of the White Wolf and it took forever, like an hour forever. I closed the installation and restarted my computer, reopened the installation and clicked “repair”. The window is not responding and I was wondering if the installation is meant to take forever, or if I’m doing something wrong. I’m to install it into the Witcher folder and not Override, right?
No, that is not normal. It shouldn’t take longer then 15 minutes.
If you have the Steam version, can you do a check integrity of Game Cache (check https://support.steampowered.com/kb_article.php?ref=2037-QEUH-3335 to see how).
If you don’t have a Steam version, I think it is better to reinstall the game itself (make sure all the folders are gone before you reinstall the game).
After that, check if the game runs. And redownload the Rise of the White Wolf, it might be that the file got corrupted when downloading.
Thanks Amstroid and Nes, but I think I figured out the problem. I’ll try installing the mods later this week, but a big problem I had was that The Witcher took upwards of 13 minutes to launch. I told my friend and he suggested that I clean out my registry, and after doing so Witcher takes about 20 seconds to start. That probably contributed to the ridiculously long install time. I’ll update you eventually.
13 minutes to launch? Wow, you have a lot of patience. I’ll await your updates 🙂
Hey Amstroid, it’s looking pretty good so far and I’m almost finished installing. I just have a quick question, you say here: “Now we are going to install the last 3 graphic mods: “Perfect Rain Mod“, “The Witcher Perfect Blood – Full DL” and “The Witcher Perfect Blood – Fix“. Extract all the files from the first mod in your \Override folder.” but lower down you say “Last, place the files from “Perfect Rain Mod” in the usual folder (\Override), and overwrite the files by selecting “yes”.” Were you not talking about the rain mod then? I’ve done everything above so it seems like you want me to find the files from Rise of The White Wolf and put them in override? I don’t quite understand. Sorry for the big chunk of a post.
Haha, I never realised I made that mistake. It was while editing that I have swapped the order of the mods. It should be fixed now
Hey buddy, the mods are working great (except the rain scroll one, I installed it correctly but it isn’t showing up, perhaps I need to use it on a brand new game? I don’t mind the rain, though.) and I didn’t install the combat mod out of personal preference, but every time I load into an area, the game will re-add the vest I’m wearing and my steel sword, this really messes me up during fights, any idea on what’s causing this?
Hmm, can’t say I know that problem. Have you checked the official forums?
@Niko, I had great luck copying his Override folder from the WeTransfer link Amstroid posted above. It was a fresh install, so I didn’t even have an Override folder yet. The only other thing I had to do was copy the attackeffects.2da to my Data folder (from “The Witcher Perfect Blood — Fix” he mentioned above). Works flawlessly thus far except for having to disable the Steam overlay in-game (which isn’t the fault of the mods), because otherwise my main menu isn’t responsive (unless I hold down the Shift key). Good luck!
Thanks so much for this. Was going to mention that the dropbox link is disabled, but you posted an alternative WeTransfer link. Really appreciate you doing this! Must’ve taken quite a bit of time, but will save so many people a ton more. Never played any Witcher games, but want to check this out along with Witcher 2 before diving into Witcher 3. Now I’m super pumped!
Speaking of which, can’t wait for the Witcher 2 version of this guide!
Already made and published 🙂
https://www.gamingboulevard.com/2015/05/special-lets-mod-the-witcher-2-assassins-of-kings-enhanced-edition/
Have fun and feel free to contact me if you should have any problems
Well, to be honest, I have no idea where it could have gone wrong. Because (as far as I know) FCR doesn’t affect architectural textures or models. But if it’s working now, I should leave it like that. Enjoy the game 🙂
Well for a start, the beams in the Inn of Chapter 1 were nonexistent, just a bunch of color mishmash and outside of the Inn, the whole overworld was blurry and the palisades were missing. So it was basically unplayable.
I’m not sure whether or not I did something wrong with the installation but like I said after deinstalling FCR everything went back to normal ^^
Really? Damn, because FCR really improves the combat. Which textures were horrific? Because there might be a mistake in the guide?
I finally got the mods to work, thank you. 🙂
PS: I had problems with the FCR mod, which rendered some textures completely horrific. After deinstalling it however, everything got back to normal.
It might be some leftovers from other mod that I tried, but didn’t get to work. Since they are merely textures, I didn’t bother to remove them.
And no, you do not have to move the .dss files from any mod that’s installed with an .exe file. Most of the time, those belong together. Moving them will cause errors.
I followed your guide as thoroughly as possible but now I have only 3313 .dss files instead of 3398. The rest is exactly as in the screencap.
What could be the error?
Also do you have to move .dss files from the white wolf mod into the Override folder?
Thanks in advance ^^
I’ll do that tonight, after work 😉
Did you managed to follow the guide to remove the double files?
Could you please post a screencap of your Override folder? That would really help me.
Since I’m new to this modding thing, I haven’t been able to set up the mods quite right ^^
Thank you.
Where should i install the exe files? Because i dont see them on the screenshot they generate a launcher .exe uninstall exes and so on
They should get the directory of The Witcher Enhanched Edition.
I tried it yesterday the whole day but i didnt get it working. So i gave up on that. But i´m curious what i made wrong? i can send a a dropbox link with pictures in it how it looks.
You can send it to contact@gamingboulevard.com. I’ll take a look
Hey, I’m having the same issue I think. Did you just download the .exe files into “The Witcher Enhanced Edition” Folder? Aren’t there now repeat folders etc… I downloaded the Override Folder from the provided link, after deleting the one I tried to make, but where exactly do I put all the other files? Like the Rise of the Wolf creates a new launcher and stuff…